Angular 9 – aplikacja kalkulator tutorial
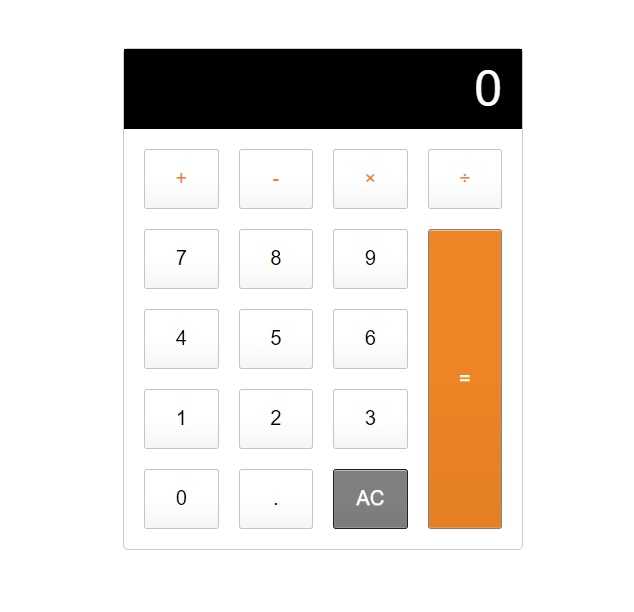
W tym poście postaram się w czytelny sposób pokazać jak stworzyć prostą aplikację kalkulatora. Zapoznamy się z takimi elementami Angulara jak moduły (modules), komponenty (components), dyrektywy (directives), zdarzenia (event) oraz przypisywanie własności (property binding).
Gotowy projekt możecie zobaczyć w wersji live pod adresem stackblitz natomiast sam kod znajduje się w repozytorium gita.
Tworzymy nowy projekt
Zakładam, że mamy już zainstalowaną najnowszą wersję Node.js, npm oraz AngularCli w przeciwnym wypadku odsyłam do mojego wcześniejszego posta, w którym opisuję cały proces instalacji.
W celu stworzenia nowego projektu przechodzimy do katalogu, w którym chcemy umieścić naszą aplikację, uruchamiamy wiersz poleceń i wpisujemy:
ng new calculatorCLI zapyta nas czy chcemy użyć routingu w naszym projekcie odpowiadamy, że nie ponieważ nie będziemy go potrzebować w tej aplikacji. Jako format stylesheet wybieramy CSS.
Generowanie nowego projektu chwile potrwa.
W celu sprawdzenia czy wszystko działa poprawnie przechodzimy do utworzonego przez CLI katalogu i uruchamiamy aplikację poprzez następujące polecenia.
cd calculator
ng serve -–open
Po kompilacji, aplikacja otworzy się automatycznie w domyślnej przeglądarce. Dostępna jest pod adresem http://localhost:4200.
Pierwszy komponent
Komponent w dużym uproszczeniu jest klasą TypeScript z kodem HTML i CSS wyświetlającym treść w aplikacji.
Aby utworzyć nowy komponent otwieramy wiersz poleceń w katalogu z naszą aplikacją i wpisujemy:
ng generate component calculator - -skipTestspolecenie generate component pozwala nam w szybki sposób utworzyć pliki wchodzące w skład komponentu tj.:
folder calculator w src/app/ , który zawiera pliki:
• calculator.component.css – style css
• calculator.component.html - strukturę html
• calculator.component.ts – część logiczna komponentu
- -skipTests informuję CLI żeby nie tworzyło w komponencie pliku służącego do testów.
Możemy też zauważyć, że nowo utworzony przez nas komponent został automatycznie zaimportowany do naszej aplikacji w pliku src/app/app.module.ts
Gdy otworzymy src/app/calculator/calculator.component.ts zobaczymy poniższy kod .
import { Component, OnInit } from '@angular/core';
@Component({
  selector: 'app-calculator',
  templateUrl: './calculator.component.html',
  styleUrls: ['./calculator.component.css']
})
export class CalculatorComponent implements OnInit {
  constructor() { }
  ngOnInit(): void {
  }
}
Zaczynając od góry najpierw importujemy Component oraz OnInit z @angular/core. W skład Componentu wchodzi:
- selector: pozwala dać naszemu komponentowi tag po którym będziemy w stanie go wywoływać w kodzie HTML
- templateUrl: zawiera ścieżkę do naszego kodu HTML odpowiadającego za strukturę naszego komponentu
- styleUrl: zawiera ścieżkę do stylesheets naszego komponentu
Ponieważ nie dodaliśmy routingu do aplikacji musimy umieścić nasz komponent w głównym pliku html projektu. W tym celu przechodzimy do src/app/app.component.html usuwamy przykładowy kod dodany przez deweloperów Angulara i umieszczamy tag z naszym komponentem:
<app-calculator></app-calculator>Dodanie HTML oraz CSS
Przechodzimy do utworzonego przez nas wcześniej komponentu, a dokładniej src/app/calculator/calculator.component.html i zastępujemy istniejący tam kod poniższym:
<div class="calculator">
<input type="text" class="calculator-screen" value="0" disabled />
<div class="calculator-keys">
<button type="button" class="operator" value="+">+</button>
<button type="button" class="operator" value="-">-</button>
<button type="button" class="operator" value="*">×</button>
<button type="button" class="operator" value="/">÷</button>
<button type="button" value="7">7</button>
<button type="button" value="8">8</button>
<button type="button" value="9">9</button>
<button type="button" value="4">4</button>
<button type="button" value="5">5</button>
<button type="button" value="6">6</button>
<button type="button" value="1">1</button>
<button type="button" value="2">2</button>
<button type="button" value="3">3</button>
<button type="button" value="0">0</button>
<button type="button" class="decimal" value=".">.</button>
<button type="button" class="all-clear" value="all-clear">AC</button>
<button type="button" class="equal-sign" value="=">=</button>
</div>
</div>Następnie przechodzimy do src/app/calculator/calculator.component.css i dodajemy następujące style do naszego komponentu:
.calculator {
  border: 1px solid #ccc;
  border-radius: 5px;
  position: absolute;
  top: 50%;
  left: 50%;
  transform: translate(-50%, -50%);
  width: 400px;
}
.calculator-screen {
  width: 100%;
  font-size: 5rem;
  height: 80px;
  border: none;
  background-color: #000000;
  color: #fff;
  text-align: right;
  padding-right: 20px;
  padding-left: 10px;
}
button {
  height: 60px;
  background-color: #fff;
  border-radius: 3px;
  border: 1px solid #c4c4c4;
  background-color: transparent;
  font-size: 2rem;
  color: #000;
  background-image: linear-gradient(to bottom, transparent, transparent 50%, rgba(0, 0, 0, .04));
  box-shadow: inset 0 0 0 1px rgba(255, 255, 255, .05), inset 0 1px 0 0 rgba(255, 255, 255, .45), inset 0 -1px 0 0 rgba(255, 255, 255, .15), 0 1px 0 0 rgba(255, 255, 255, .15);
  text-shadow: 0 1px rgba(255, 255, 255, .4);
}
button:hover {
  background-color: #FFA500;
}
.operator {
  color: #EF8614;
}
.all-clear {
  background-color: #808080;
  border-color: #1F1F1F;  color: #fff;
}
.all-clear:hover {
  background-color: #383838;
}
.equal-sign {
  background-color: #EF8614;
  border-color: #808080;
  color: #fff;
  height: 100%;
  grid-area: 2 / 4 / 6 / 5;
}
.equal-sign:hover {
  background-color: #F89900;
}
.calculator-keys {
  display: grid;
  grid-template-columns: repeat(4, 1fr);
  grid-gap: 20px;
  padding: 20px;
}
Musimy także dodać kilka styli do globalnego widoku aplikacji. Przechodzimy do src/styles.css . Style zawarte w tym pliku mają wpływ na wszystkie komponenty aplikacji. Dodajemy tam następujący kod:
html {
  font-size: 62.5%;
  box-sizing: border-box;
}
*,
*::before,
*::after {
  margin: 0;
  padding: 0;
  box-sizing: inherit;
}
Po powyższym możemy sprawdzić czy wszystko działa poprawnie poprzez skompilowanie aplikacji. W tym celu w wierszu poleceń wpisujemy:
ng serveMamy już gotowy szkielet oraz wygląd naszej aplikacji. Jedyne co nam pozostało to przy pomocy Angulara ożywić nasz projekt.
Dodanie logiki TypeScript
W projekcie mamy cztery typy buttonów:
• cyfry (0-9)
• operatory (+, -, *, /, =)
• separator dziesiętny (.)
• reset (AC)
Dodamy teraz obsługę nasłuchiwania oraz poinformujemy Angulara który typ przycisków został wciśnięty.
W tym celu przechodzimy do src/app/calculator/calculator.component.ts i definiujemy zmienną.
import { Component, OnInit } from '@angular/core';
@Component( {
  selector: 'app-calculator',
  templateUrl: './calculator.component.html',
  styleUrls: ['./calculator.component.css']
} )
export class CalculatorComponent implements OnInit {  currentNumber='0';
  firstOperand=null;
  operator=null;
  waitForSecondNumber=false;
  constructor () { }
  ngOnInit(): void {
 }
}
• currentNumber – przechowuje string, który będzie wyświetlany w input element
• firstOperand – przechowuje pierwszą wpisaną wartość
• operator – przechowuje operator
• waitForSecondNumber – przechowuje wartość boolean wskazującą czy użytkownik zakończył wpisywanie pierwszej wartość oraz czeka w gotowość na kolejne działanie
Definiowanie metod
Wszystkie poniższe metody dodajemy do pliku src/app/calculator/calculator.component.ts. Dopisujemy je przed constructorem.
getNumber – posłuży do ustalenia obecnie użytej liczby
public getNumber( v: string ) {
    console.log( v );
    if ( this.waitForSecondNumber ) {
      this.currentNumber=v;
      this.waitForSecondNumber=false;
    } else {
      this.currentNumber==='0'? this.currentNumber=v:this.currentNumber+=v;
    }
  }
getDecimal – doda separator dziesiętny
getDecimal() {
    if ( !this.currentNumber.includes( '.' ) ) {
      this.currentNumber+='.';
    }
  }
doCalculation – doda obliczenia z uwzględnieniem użytego operatora
private doCalculation( op, secondOp ) {
    switch ( op ) {
      case '+':
        return this.firstOperand+=secondOp;
      case '-':
        return this.firstOperand-=secondOp;
      case '*':
        return this.firstOperand*=secondOp;
      case '/':
        return this.firstOperand/=secondOp;
      case '=':
        return secondOp;
    }
  }
getOperation – wykona zadane działanie
public getOperation( op: string ) {
    console.log( op );
    if ( this.firstOperand===null ) {
      this.firstOperand=Number( this.currentNumber );
    } else if ( this.operator ) {
      const result=this.doCalculation( this.operator, Number( this.currentNumber ) )      this.currentNumber=String( result );
      this.firstOperand=result;
    }
    this.operator=op;
    this.waitForSecondNumber=true;

    console.log( this.firstOperand );

  }
clear – zresetuje działania
public clear() {
    this.currentNumber='0';
    this.firstOperand=null;
    this.operator=null;
    this.waitForSecondNumber=false;
  }
Cały plik src/app/calculator/calculator.component.ts powinien wyglądać następująco:
import { Component, OnInit } from '@angular/core';
@Component( {
  selector: 'app-calculator',
  templateUrl: './calculator.component.html',
  styleUrls: ['./calculator.component.css']
} )
export class CalculatorComponent implements OnInit {
  currentNumber='0';
  firstOperand=null;
  operator=null;
  waitForSecondNumber=false;
  public getNumber( v: string ) {
    console.log( v );
    if ( this.waitForSecondNumber ) {
      this.currentNumber=v;
      this.waitForSecondNumber=false;
    } else {
      this.currentNumber==='0'? this.currentNumber=v:this.currentNumber+=v;
    }
  }
  getDecimal() {
    if ( !this.currentNumber.includes( '.' ) ) {
      this.currentNumber+='.';
    }
  }
  private doCalculation( op, secondOp ) {
    switch ( op ) {
      case '+':
        return this.firstOperand+=secondOp;
      case '-':
        return this.firstOperand-=secondOp;
      case '*':
        return this.firstOperand*=secondOp;
      case '/':
        return this.firstOperand/=secondOp;
      case '=':
        return secondOp;
    }
  }
  public getOperation( op: string ) {
    console.log( op );
    if ( this.firstOperand===null ) {      this.firstOperand=Number( this.currentNumber );
    } else if ( this.operator ) {
      const result=this.doCalculation( this.operator, Number( this.currentNumber ) )
      this.currentNumber=String( result );
      this.firstOperand=result;
    }
    this.operator=op;
    this.waitForSecondNumber=true;
    console.log( this.firstOperand );
  }
  public clear() {
    this.currentNumber='0';
    this.firstOperand=null;
    this.operator=null;
    this.waitForSecondNumber=false;
  }
  constructor () { }
  ngOnInit(): void {
  }
}
Pozostaje nam tylko dodać metody (getOperation, getNumber, getDecimal, clear) oraz zdarzenia (click) do utworzonego wcześniej pliku html naszego komponentu. Poniżej uzupełniony plik src/app/calculator/calculator.component.html
<div class="calculator">
<input type="text" class="calculator-screen" [value]="currentNumber" disabled />
<div class="calculator-keys">
<!-- operators -->
<button type="button" (click)="getOperation('+')" class="operator" value="+">+</button>
<button type="button" (click)="getOperation('-')" class="operator" value="-">-</button>
<button type="button" (click)="getOperation('*')" class="operator" value="*">×</button>
<button type="button" (click)="getOperation('/')" class="operator" value="/">÷</button>
<!-- digits -->
<button type="button" (click)="getNumber('7')" value="7">7</button>
<button type="button" (click)="getNumber('8')" value="8">8</button>
<button type="button" (click)="getNumber('9')" value="9">9</button>
<button type="button" (click)="getNumber('4')" value="4">4</button>
<button type="button" (click)="getNumber('5')" value="5">5</button>
<button type="button" (click)="getNumber('6')" value="6">6</button>
<button type="button" (click)="getNumber('1')" value="1">1</button>
<button type="button" (click)="getNumber('2')" value="2">2</button>
<button type="button" (click)="getNumber('3')" value="3">3</button>
<button type="button" (click)="getNumber('0')" value="0">0</button>
<!-- decimal-reset-equal -->
<button type="button" (click)="getDecimal()" class="decimal" value=".">.</button>
<button type="button" (click)="clear()" class="all-clear" value="all-clear">AC</button>
<button type="button" (click)="getOperation('=')" class="equal-sign" value="=">=</button>
</div>
</div>I to już wszystko jeżeli chodzi o naszą aplikację.
W celu jej uruchomienia wpisujemy w wierszu poleceń komendę:
ng severBardzo szybko stworzyliśmy nowy projekt od zera w którym wykorzystaliśmy kilka funkcjonalności Angulara m.in. moduły, komponenty, data binding. Nie jest to na pewno koniec serii o tym frameworku. W następnych postach zajmiemy się kolejnymi zagadnieniami związanymi z Angularem.

